Parcel Drafter is a configuration of Web AppBuilder for ArcGIS that can be used by mapping technicians to enter metes and bounds descriptions and check for closure errors. Parcel Drafter is typically used by assessors and registrar of deeds to verify deeds and recorded documents, but it can also be used by surveyors and title companies to verify survey information prior to submission.
For information regarding the specific layer and map requirements, see the Parcel Drafter help.
Configure the Parcel Drafter widget
- Hover over the widget and click the Configure this widget button
 to open the configuration properties dialog box.
 - Optionally click the Change widget icon button and replace it with your own image.
A file explorer window appears, allowing you to select a local image file to use as the widget icon.
- In the Parcel layer section, select Parcel Layers by clicking Set.
- Click the Polygon Layer drop-down arrow and choose Parcels.
By default, Select related line layer automatically sets Lines as the default layer if the layer is in the map.
- Click OK.
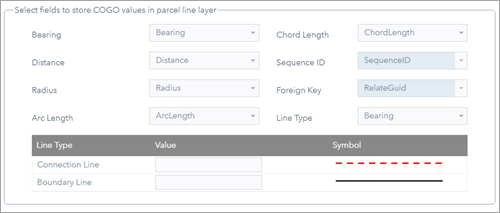
- In the Select fields to store COGO values in parcel line layer settings, choose the Category field as the Line Type.

- In the Select fields to store parcel polygon attributes settings, choose Name Field as the Parcel Name.
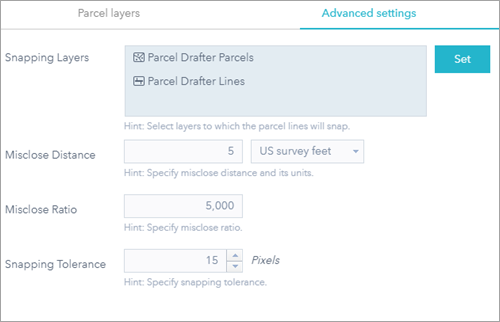
- Click Advanced Settings > Set and choose the layers you want to snap to by clicking and checking the box next to the Lines and Parcel layers.
- Click OK.
- Type the misclose distance in the Misclose Distance text box, and specify the units by clicking the drop-down arrow..
- Type the misclose ratio in the Misclose Ratio text box.
- Type the desired number of measurement units in the Snapping Tolerance text box.

- Click OK.
- Hover over the Parcel Drafter widget, and click the dot at the lower left so it changes to dark green. This will cause the widget to automatically open when the app starts.
- Click the Attribute tab, and remove the subtitle.
- Save the app.
- Open your Parcel Drafter app.
Using the Parcel Drafter widget
To create a new parcel, complete the following steps:
- In the Parcel Drafter widget, click Start New Traverse.
- Click the Settings option and choose Direction or Angle Type, Direction or Angle Units, Distance and Length Units, Area Units, and Circular Curve Parameters from the drop-down list that best represent the units of the incoming document.
- Click on the map to specify a starting point for the traverse.
The starting point can snap to points or vertices for the layers configured in the Snapping Layers setting in the Parcel Drafter widget configuration window.
- In the line template drop-down list, choose either the Boundary line or Connection line as the line type of your parcel traverse leg.
- Type the dimensions of the parcel traverse in the Bearing, Length, and Radius text boxes.
As you type in dimensions, the traverse lines are drawn on the map from the starting point. The last leg of the parcel traverse will close and snap to the starting point of the traverse if the starting and ending points of the traverse lie within the misclose distance, misclose ratio, and snapping tolerance specified in the Parcel Drafter widget configuration window.
Tip:
To enter a bearing in degrees/minutes/seconds using quadrant bearing, type the values in one of the following formats: 20-25-25-3 (3 is the shortcut for the southwest quadrant), or S20-25-25W. When entering a bearing in decimal degrees, type the value in the following format: 90.4236. To enter tangent curves, type *tb in the Bearing text box, or * to make the next line the same bearing as the previous. Traverse legs can be deleted and re-ordered in the grid.
- The angle and scale can be entered at any time during the traverse to rotate and scale new lines.
Tip:
After entering the first line of the traverse (and rotation/scale values have not been specified), you can rotate the line to fit the underlying geometry (for example, section line, parcels, or other survey lines). All subsequent lines will be applied this rotation, but the records, bearings, and distances will be captured as entered.
- Optionally add a parcel name, document type, and plan name.
- Click Save.
Edit a parcel
To edit a parcel, complete the following steps:
- Open the Parcel Drafter app.
- In the Parcel Drafter widget, click Edit Traverse.
- Click an existing parcel and edit the traverse or attribute information.
- Click Save.